
Build Your Dream Gaming Rig Without Overspending or Making Costly Mistakes
Building a gaming PC used to feel intimidating to me. The first time I opened a computer case, I honestly thought I might break something expensive within minutes. Fast forward several builds later, and I’ve learned that assembling a gaming PC is far less complicated than most people imagine.
In fact, building your own gaming PC gives you complete control over performance, appearance, upgradeability, and budget. Whether you’re aiming for smooth 1080p gaming, high-refresh-rate 1440p gameplay, or a powerful 4K gaming machine, choosing your own components often delivers better value than buying a prebuilt system.
This guide walks through the entire process of how to build a gaming PC, from selecting compatible components to installing Windows and optimizing performance.
If you’re building your first setup and want affordable component recommendations before choosing parts individually, check out the Best Budget Gaming PC Build for 2026 to compare cost-effective builds that still deliver solid gaming performance.
Overview: How to Build a Gaming PC
Building a gaming PC involves four major stages:
- Choose compatible components.
- Assemble the motherboard, CPU, RAM, SSD, and cooler.
- Install everything inside the PC case.
- Configure BIOS and install Windows and drivers.
Before starting, clear a large workspace, keep a magnetic Phillips-head screwdriver nearby, and allow yourself several uninterrupted hours.
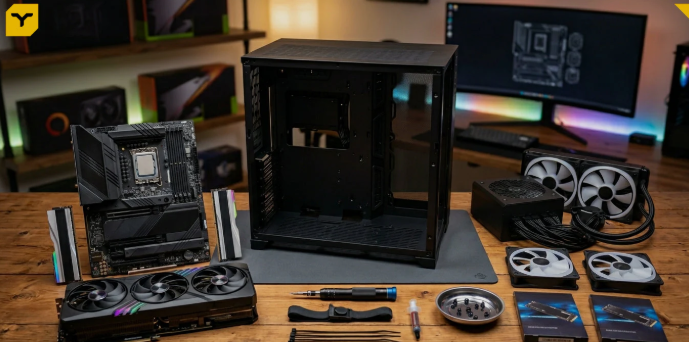
A modern gaming PC typically requires:
- CPU (Processor)
- GPU (Graphics Card)
- Motherboard
- RAM
- SSD Storage
- Power Supply (PSU)
- CPU Cooler
- PC Case
Why Build a Gaming PC Instead of Buying a Prebuilt?
In my experience, the biggest advantage is customization.
When you build your own system, you can choose exactly what matters most:
- Faster graphics card
- Better airflow
- More storage
- Quieter cooling
- RGB lighting (or none at all)
I once compared a prebuilt gaming PC with a custom build using nearly identical components. The custom build delivered better cooling, a stronger power supply, and a larger SSD while costing less overall.
That’s why DIY gaming PCs remain popular among enthusiasts.
Step 1: Choose Your Gaming PC Components
Choosing the right components is the foundation of every successful build.
I always recommend checking compatibility using PCPartPicker before purchasing anything.
CPU: The Brain of Your Gaming PC
The processor handles game logic, background tasks, and system responsiveness.
Excellent gaming CPUs in 2026 include:
- AMD Ryzen 7 7800X3D
- AMD Ryzen 7 9800X3D
- AMD Ryzen 9 9950X3D
- Intel Core i5-14400F
- Intel Core Ultra series
For most gamers, a 6-core or 8-core processor provides the best balance between price and performance.
AMD vs Intel for Gaming
Currently, AMD’s X3D processors dominate gaming benchmarks thanks to their massive cache designs.
The Ryzen 7 9800X3D and Ryzen 7 7800X3D remain among the best gaming CPUs available.
GPU: The Most Important Gaming Component
If your budget is limited, prioritize the graphics card.
Popular gaming GPUs include:
- Nvidia RTX 5060
- Nvidia RTX 5060 Ti
- Nvidia RTX 5090
- AMD Radeon RX 7600
- AMD Radeon RX 9070 XT
For modern gaming:
- 1080p Gaming → RTX 5060 or RX 7600
- 1440p Gaming → RTX 5060 Ti or RX 9070 XT
- 4K Gaming → RTX 5090
The GPU determines frame rates, ray tracing capability, and overall visual quality.
Motherboard Selection
Your motherboard connects every component together.
Reliable options include:
- MSI MAG B850 Tomahawk MAX WiFi
- MSI Pro B650-S WiFi
- Asus ROG Strix X870E-E Gaming WiFi
Look for:
- DDR5 support
- Wi-Fi 6E or Wi-Fi 7
- Multiple M.2 SSD slots
- BIOS Flashback support
RAM Recommendations
Modern gaming PCs should use:
- 16GB DDR5 (entry-level)
- 32GB DDR5 (recommended)
Popular memory kits include:
- Corsair Vengeance DDR5
- Patriot Viper Elite DDR5
- G.Skill Trident Z5 RGB
For gaming, 32GB DDR5 is currently the sweet spot.
Storage: SSD vs HDD
I strongly recommend NVMe M.2 SSDs.
Excellent options include:
- Samsung 990 Pro
- Patriot Viper VP4300 Lite
- Patriot P400
Benefits include:
- Faster boot times
- Faster game loading
- Better system responsiveness
Aim for at least 1TB, while 2TB is ideal for larger game libraries.
Power Supply (PSU)
Never cut corners on the PSU.
Trusted models include:
- ASRock Steel Legend SL850G
- ASRock Challenger Series
- Super Flower Leadex VII XP Pro
Look for:
- 80 Plus Gold certification
- ATX 3.1 support
- PCIe 5.1 connectors
Choosing a PC Case
Good airflow matters more than many beginners realize.
Popular choices include:
- Fractal Design North XL
- Montech Sky 3
- Be Quiet Pure Base 501 LX
Look for:
- Mesh airflow panels
- Multiple fan mounts
- Room for large GPUs
- USB-C front ports
Step 2: Assemble Core Components Outside the Case
Building outside the case first makes installation easier.
Install the CPU
Carefully align the CPU’s triangle marker with the motherboard socket marker.
Never force the processor.
When I built my first PC, I spent five nervous minutes checking alignment because I was terrified of bending pins. Taking your time is always worth it.
Install the M.2 SSD
Insert the SSD at a slight angle.
Secure it using the motherboard’s mounting screw or quick-release mechanism.
Reinstall any heatsinks afterward.
Install RAM
Open the retention clips.
Line up the RAM notch.
Press firmly until you hear a click.
If the system doesn’t boot later, improperly seated RAM is often the culprit.
Install the CPU Cooler
Apply thermal paste if necessary.
A pea-sized amount is usually enough.
Popular coolers include:
- ID-Cooling FX360
- Cooler Master MasterLiquid PL360 Flux
Connect the fan cable to the CPU_FAN header.
Step 3: Install Hardware into the PC Case
Now the exciting part begins.
Install the Power Supply
Mount the PSU near the bottom of the case.
Secure it using the included screws.
Route major cables before installing other components.
Install the Motherboard
Carefully place the motherboard onto the standoffs.
Secure it evenly without overtightening.
Double-check all screw positions.
Connect Cables
Connect:
- 24-pin motherboard cable
- 8-pin CPU cable
- Front panel connectors
- USB headers
- Audio headers
Good cable management improves airflow and simplifies future upgrades.
Install the Graphics Card
Remove the required PCIe slot covers.
Insert the GPU into the primary PCIe slot.
Secure it using screws.
Connect GPU power cables.
Watching a powerful graphics card click into place is one of the most satisfying moments of any PC build.
Step 4: First Boot and Software Setup
Moment of truth.
Power On the System
Connect:
- Monitor
- Keyboard
- Mouse
- Power cable
Turn on the PSU and press the case power button.
If everything works, congratulations!
Configure BIOS
Enter BIOS and verify:
- CPU detection
- RAM detection
- SSD detection
- Temperatures
Enable:
- XMP (Intel)
- EXPO (AMD)
This ensures your RAM operates at its advertised speed.
Install Windows and Drivers
Install Windows 11 from a USB drive.
Then install:
- Nvidia graphics drivers
- AMD graphics drivers
- Motherboard chipset drivers
- Wi-Fi drivers
Driver updates can significantly improve gaming performance.
Common Gaming PC Building Mistakes
Avoid these beginner errors:
- Buying incompatible parts
- Choosing a cheap power supply
- Forgetting motherboard standoffs
- Applying too much thermal paste
- Plugging monitor into motherboard instead of GPU
- Ignoring BIOS updates
I’ve seen every one of these mistakes happen, including some in my own builds.
Quick Tips for First-Time Builders
- Watch several build videos before starting.
- Keep motherboard manuals nearby.
- Work slowly and stay organized.
- Test components before full cable management.
- Keep extra screws in a small container.
Frequently Asked Questions
Is it cheaper to build a gaming PC?
Usually yes. Building your own PC often provides better component quality and upgrade flexibility than similarly priced prebuilt systems.
How much RAM do I need for gaming?
16GB works for most games, but 32GB DDR5 offers a smoother experience for modern titles and multitasking.
Should I choose AMD or Intel?
For gaming-focused systems, AMD’s Ryzen X3D processors currently offer exceptional performance. Intel remains strong for mixed gaming and productivity workloads.
Is DDR5 worth it?
Yes. DDR5 has become the standard for new gaming builds and provides better long-term upgrade potential.
Final Thoughts
Learning how to build a gaming PC may seem overwhelming at first, but it quickly becomes one of the most rewarding tech projects you can tackle.
Whether you’re assembling a budget 1080p gaming machine with an Intel Core i5-14400F and Radeon RX 7600 or creating a dream 4K setup featuring a Ryzen 9 9950X3D and RTX 5090, the process teaches you exactly how your system works and gives you complete control over future upgrades.
The first time your custom-built PC powers on successfully, you’ll understand why so many gamers become lifelong PC builders.
Have you built a gaming PC before, or are you planning your first build? I’d love to hear about your setup and experiences.